Simple Inspection Tips Before Starting Gutter Repair


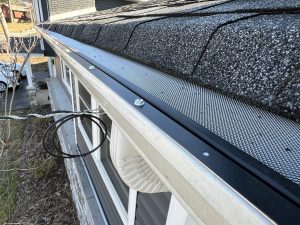
Gutter problems rarely start with a dramatic failure. More often, they begin quietly, with a loose spike, a seam that opens a little each season, or a downspout that clogs just enough to slow water on a heavy rain. By the time water stains show up on fascia boards or mulch starts washing out of a flower bed, the actual cause may have been building for months.
That is why the inspection matters as much as the repair itself. A careful look before you touch a hanger, seal a joint, or replace a section of trough can save time, prevent repeat work, and stop you from fixing the symptom while missing the real problem. Good Gutter Repair starts with knowing what failed, why it failed, and whether the gutter is even the only system involved.
I have seen homeowners patch the same leaking corner three times because the real issue was not the corner at all. The gutter slope was off by less than half an inch over a long run, and water was standing in the trough after every storm. The sealant was never going to hold for long because it was being asked to compensate for poor drainage. That kind of mistake is common, and it usually starts with skipping the inspection.
Start from the ground, not the ladder
There is a strong temptation to grab a ladder right away. Resist it. The first pass should happen from the ground, ideally in daylight, with dry conditions and enough room to step back and look at the roofline as a whole.
Walk the perimeter of the house and study the gutters from several angles. Look for sections that appear bowed, tilted, or lower than the runs beside them. Even from ground level, a sagging stretch often reveals itself by the way it breaks the line of the fascia. If one end looks noticeably lower and there is no downspout nearby, that section may be holding water.
Pay attention to staining on siding, brick, or trim. Vertical dirt marks often tell a story. A stain directly beneath a joint suggests overflow or leakage at the seam. Wide splatter marks near the base of the wall can point to water shooting over the front edge during storms, which may mean a clog, an undersized gutter, or shingles extending too far over the trough.
Landscaping offers clues too. If one bed is eroded while another stays intact, ask where the water is actually going. I once inspected a house where the owner was convinced the front gutter needed replacement because water kept dumping near the porch. The gutter was fine. The downspout elbow had twisted just enough that runoff was pouring behind a shrub line, soaking the soil and then surfacing ten feet away. From the porch, it looked like the gutter itself was failing.
A ground inspection also helps you spot issues outside the gutter system. If roof shingles are curling hard at the edge, if drip edge flashing is missing, or if fascia wood already looks soft and swollen, your repair plan may need to expand.
What to bring before you inspect closely
A simple inspection does not require a truck full of equipment, but a few basics make the work safer and more accurate.
- A stable extension ladder or step ladder suited to the gutter height
- Work gloves and eye protection
- A flashlight and a small tape measure
- A garden hose with a spray nozzle
- A notepad or phone for photos and measurements
That short list covers most residential inspections. The flashlight matters more than many people expect, especially under roof edges or inside downspout openings where packed debris can hide. Photos help too. When you are standing on a ladder, it is easy to think you will remember which end cap was pulling away or which hanger had backed out. By the time you get down, those details blur together.
Check the gutter material before planning the repair
Not every gutter behaves the same way, and repair methods that work on one material can be wrong for another. Aluminum, vinyl, galvanized steel, and copper each fail in their own way.
Aluminum is common because it is light, affordable, and resistant to rust, but it dents easily. If an aluminum gutter has pulled away from the fascia, check whether the metal around the hangers is stretched or torn. If it is, simply reinstalling the hanger may not hold. The metal itself may no longer have enough integrity to support the load.
Vinyl gutters do not corrode, but they become brittle over time, especially in climates with strong sun and wide temperature swings. A crack near a joint on an older vinyl system often means more cracks are coming. In https://landengjes308.talesignal.com/posts/how-gutter-repair-helps-preserve-curb-appeal that situation, a local patch may buy a little time, but it may not be the smartest long-term Gutter Repair.
Steel gutters can rust from the inside out, especially where wet debris has sat for years. Surface rust can sometimes be cleaned and treated. Deep pitting is different. If a screwdriver easily penetrates the metal, sealing the hole is not a repair, it is a delay.
Copper is durable and ages well, but repairs call for a different hand. Mixing fasteners or sealants that are incompatible with copper can create new problems. If you inspect a copper system and see failed solder joints or distortion around outlets, that usually deserves a more specialized approach.
Look at how the gutter is attached
A surprising number of gutter failures are really fastening failures. The trough may still be serviceable, but the way it is mounted to the house has weakened.
Older systems often use spikes and ferrules. When those loosen, the gutter begins to pull away from the fascia, creating a visible gap at the back edge. In mild cases, the spike can be reset or replaced with a more secure fastener. In worse cases, the wood behind the fastener is rotted and no screw will hold properly until the wood issue is addressed.
Modern hidden hangers generally perform better, but they are not immune to trouble. If hangers are spaced too far apart, if ice loads were heavy, or if a ladder was leaned directly on the gutter, sections can sag between support points. During your inspection, note whether the gutter body is deformed around the hanger locations. Distorted metal tells you the system has been stressed beyond a simple alignment problem.
Check the fascia itself with care. Press gently with a screwdriver or awl if you suspect rot, but do not gouge sound wood unnecessarily. Softness, flaking paint, black staining, and mushroomed grain all suggest moisture damage. Repairing the gutter without dealing with deteriorated fascia usually leads to callbacks and frustration. The gutter needs a solid structure behind it.
Slope is where many inspections go wrong
A gutter can be clean, firmly attached, and still perform poorly if the slope is off. Water should move steadily toward the downspout without racing so fast that it overshoots outlets or overflows corners.
The correct slope is modest, usually subtle enough that you may not notice it unless you measure. On many houses, something in the range of about a quarter inch drop for every ten feet is typical, though conditions vary. The key point during inspection is not chasing a textbook number with blind faith. It is identifying whether the gutter has enough fall to drain and whether low spots have developed.
You can often spot trouble by looking for standing water marks inside the trough. A dirty line that remains after debris is removed shows where water sat. If the line deepens in the middle of a run, that section may be sagging. If water stains collect at the far end opposite the downspout, the pitch may be reversed or too flat.
A hose test helps. Run water into the high end of the gutter and watch what happens. If the flow hesitates, pools, or backs up before reaching the outlet, you have learned something important. If the downspout can take the water but the gutter still overflows the front edge, the issue may be roof runoff volume, gutter size, apron alignment, or shingle overhang, not just pitch.
Seams, corners, and end caps deserve extra attention
Most leaks occur at transitions. Straight sections tend to be simple. Connections are not.
Examine seams where two gutter pieces join. Look for old sealant that has cracked, shrunk, or separated from the metal. Sealant failure alone is one possibility. Movement is another. If a seam has shifted or the adjoining sections are no longer aligned, you need to understand why they moved before resealing. Expansion, poor support, or impact damage can all open a joint.
Corners work hard because they concentrate flow and often catch debris. Pine needles, granules from aging shingles, and roof moss tend to settle there. During inspection, clear enough material to see the joint itself. A corner that leaks only during intense rain may have a tiny opening that does not show up when the gutter is dry. That is where the hose test earns its keep.
End caps are small but easy to overlook. If you see staining at the very end of a gutter run, inspect the cap closely. On older systems, the cap may be separating from the body or the sealed edge may have begun to peel back. That kind of failure can mimic overflow from a clogged downspout, so it is worth confirming before you decide on the repair.
Downspouts tell you whether the system can actually discharge water
Many gutter repairs fail because the person doing the work focused only on the horizontal trough. Gutters collect water, but downspouts move it away. If they are restricted, undersized, loose, or poorly routed, the entire system suffers.
Check each downspout opening from above if it is safe to do so. The upper elbow often traps leaves, seed pods, and roofing grit. You may find a complete blockage just below the outlet while the rest of the downspout remains clear. That is a common reason a gutter seems to overflow at one spot only during heavy rain.
Then look at the straps and wall anchors. A downspout that rattles in the wind or hangs slightly off the wall will eventually pull at its joints. The problem often shows up first as leakage at elbows. If an elbow seam has opened, ask whether the section below it is carrying too much strain.
The lower termination matters as well. A perfectly repaired gutter will still create foundation issues if the downspout dumps water right beside the house. During inspection, note where runoff finishes its journey. If the splash block is missing, the extension is crushed, or the discharge point slopes back toward the wall, those conditions belong in the repair plan.
Debris tells a story if you read it properly
Cleaning a gutter before inspection is helpful, but do not throw everything out without noticing what was there. The type and pattern of debris can reveal how the system has been performing.
Fine black grit usually comes from asphalt shingles. A light amount is normal on older roofs. Heavy accumulation can clog outlet openings and speed wear at seams. Dense wet leaf matter in one section but not another may indicate that water is not moving well through that run. Moss, twigs, and roof granules packed tightly in a downspout opening often point to a recurring maintenance issue rather than a one-time clog.
If you find dirt and plant growth rooted in a gutter, that system has been holding moisture for a long time. At that stage, expect hidden corrosion in steel or damage to old sealant in aluminum systems. A gutter can look decent from the street and still be in much worse shape than expected once you remove years of organic buildup.
Watch for signs that the roof edge is part of the problem
Not every overflow is the gutter's fault. Roof geometry and edge details matter.
Shingles that extend too far beyond the roof edge can direct water over the front lip of the gutter, especially in a hard storm. On the other hand, if the shingles end too short and there is no proper drip edge, water can curl backward and run behind the gutter. That backflow often stains the fascia and eventually rots it. Homeowners sometimes assume the gutter seam is leaking because they see moisture behind the system, but the true issue is water bypassing the trough altogether.
Valleys deserve special scrutiny. A valley can dump an intense volume of water into a small section of gutter. If that section overflows while the rest of the system performs normally, the answer may not be a patch. It may require a larger outlet, a wider gutter, an extra downspout, or a splash guard. Repairs that ignore concentrated roof runoff tend to disappoint.
Drip edge flashing also deserves a look. Where it is missing or tucked incorrectly, water can sneak behind the gutter. The symptoms often resemble a failed attachment system because the fascia gets wet and the gutter loosens over time. Unless you inspect the roof edge closely, you can misdiagnose the sequence of failure.
Safety should narrow your inspection, not slow it down
The best inspection is still not worth a fall. Many gutter issues can be identified from the ground, from a window, or from a ladder position that does not require overreaching. If a roof is steep, the ground is uneven, or power lines run near the eaves, limit the inspection to what can be done safely and plan the repair accordingly.
One rule I trust is simple. If you need to lean your belt buckle past the side rails to see a problem, the ladder is in the wrong place. Reposition it. Another practical rule, especially on older homes, is to assume any visibly decayed fascia may not support extra force. Do not tug hard on a loose gutter until you know what is underneath.
For second-story work or anything involving extensive fascia damage, it is often faster and safer to treat the inspection as a diagnostic pass and schedule the repair with proper access equipment later. Rushing on a ladder leads to bad measurements, missed defects, and injuries.
Red flags that change a simple repair into a bigger project
Some findings should make you pause before buying a tube of sealant and a box of screws.
- Fascia wood that is soft, split, or visibly rotted
- Long runs with standing water or reversed slope
- Multiple leaking seams in an aging system
- Deep rust, torn metal, or brittle vinyl cracking in several places
- Persistent overflow tied to roof valleys or undersized downspouts
Any one of those can shift the job from spot repair to partial replacement or redesign. That does not mean a larger project is always necessary, but it does mean you should avoid pretending the issue is minor when the evidence says otherwise.
I remember a ranch house where the owner wanted one corner sealed before winter. During inspection, three separate clues changed the plan. The rear fascia was soft near a downspout, two gutter runs held standing water after a hose test, and a valley was dumping into a short section of undersized trough. Technically, yes, the corner leaked. Practically, that leak was only the visible part of a larger drainage failure. A small patch would have lasted through one or two storms at best.
Use the inspection to decide between repair, adjustment, and replacement
Once you have looked closely, the path forward usually becomes clearer. Some gutters truly need repair, meaning the material is sound and the failure is local. A seam needs resealing, a hanger needs replacement, or a downspout elbow needs reattachment. Those are straightforward cases.
Other systems need adjustment more than repair. The gutter may need to be rehung for proper slope, the downspout may need a new strap and extension, or the outlet may need clearing and reinforcement. In those situations, patching leaks without correcting alignment will not solve much.
Then there are systems where replacement is the honest answer. If the metal is thin in multiple areas, if the vinyl is brittle throughout, or if hidden wood damage has undermined the mounting surface, pouring labor into repeated fixes is rarely cost-effective. A good inspection helps you make that call before you sink time and money into temporary work.
That is the real value of inspecting first. You are not just hunting for obvious leaks. You are reading the whole drainage system, from roof edge to ground discharge, and deciding what kind of intervention makes sense. Gutter Repair is at its best when it is targeted, proportionate, and informed by what the house is actually doing in rain, not just by what looks damaged on a dry afternoon.
A few extra minutes spent checking slope, fasteners, fascia condition, seams, debris patterns, and downspout flow can spare you from a weekend of rework. More importantly, it can protect the parts of the house the gutter is meant to defend, the trim, the siding, the foundation, and the soil around them. Gutters are simple systems on paper. In practice, they reveal a lot to anyone willing to inspect before reaching for the tools.
Just Gutters LLC
262 Main St
Hackettstown, NJ 07840, United States
Phone: +1 201-331-9454
FAQ About Gutter Repair
Is it cheaper to repair or replace gutters?
Repair can cost less when damage is limited and the remaining system is sound. Replacement may offer better value when leaks, corrosion, or repeated failures affect several sections. An inspection and written estimate can help compare the options.
Can damaged gutters be repaired?
Many localized problems, including leaking joints, loose brackets, sagging sections, and damaged downspout connections, can be repaired. The best approach depends on the material, extent of damage, and condition of the mounting surface.
Can I repair gutters myself?
Simple ground-level checks may help identify a problem, but roof-edge work carries fall risks and may require specialized tools. Professional assessment is advisable for high gutters, loose sections, hidden wood damage, or uncertain drainage problems.